
 +1-877-790-2297
While installing the company file, you must have encountered QuickBooks error 1904. This error may also occur when users install the QuickBooks Desktop on their Windows computer. Due to this, the system goes unstable or some necessary company files are missing from your database.
Generally, users see the “Error 1904: [file path/name/extension] failed to register” on their screen. QuickBooks Desktop error 1904 can cause serious issues and thus it is important to take immediate actions to fix the error.
- What are the Key Reasons for QuickBooks Desktop Error 1904?
- How to Fix QuickBooks Error 1904 ICWrapper.DLL Failed to Register?
What are the Key Reasons for QuickBooks Desktop Error 1904?
Both QuickBooks programs and Windows computers cause certain issues in certain programs. Here, we are listing some of the best possible reasons for QuickBooks error 1904.
- The components of the Microsoft operating system are missing.
- Hard drive and read-write devices may have issues.
- The operating system is outdated.
- The installation source may create issues in creating a path.
- Your QuickBooks installer file is probably damaged or not working properly.
- Security software installed on your computer is not allowing you to proceed with the QuickBooks installation.
- Insufficient permission to install the QuickBooks software on a Windows computer.
- You have installed some new operating systems on your device.
There can be other causes as well that may cause unexpected errors. Once you determine the cause of the error, you can implement relevant methods to fix it.
How to Fix QuickBooks Error 1904 ICWrapper.DLL Failed to Register?
To fix error 1904 in QuickBooks, you can use the QuickBooks Install Diagnostic tool, correct the Windows account settings, repair Windows components manually such as Microsoft MSXML and .NET Framework.
If the error is associated with the Bitdefender then you should add QuickBooks to the exclusion list. Some users encounter errors referred to the QBversionTool.dll. If that is the case then you can test the permission and install the QuickBooks as an admin.
Fix 1: Run QuickBooks Install Diagnostic Tool
QuickBooks Install Diagnostic Tool can be used from the QuickBooks Tool Hub. By using this tool, users can scan the QuickBooks program and its company files. If the tool finds any errors, it repairs them automatically.
To access QuickBooks Install Diagnostic Tool, you need to download QuickBooks Tool Hub, in case you are not having it. Thereafter, you can carry out the following steps:
- First of all, end all the programs if running any in the background.
- Now, open “QuickBooks Tool Hub” on your Windows computer.
- Select the “Installation Issues” component. It should be located on the left.
- After that, hit the “QuickBooks Install Diagnostic Tool” button.
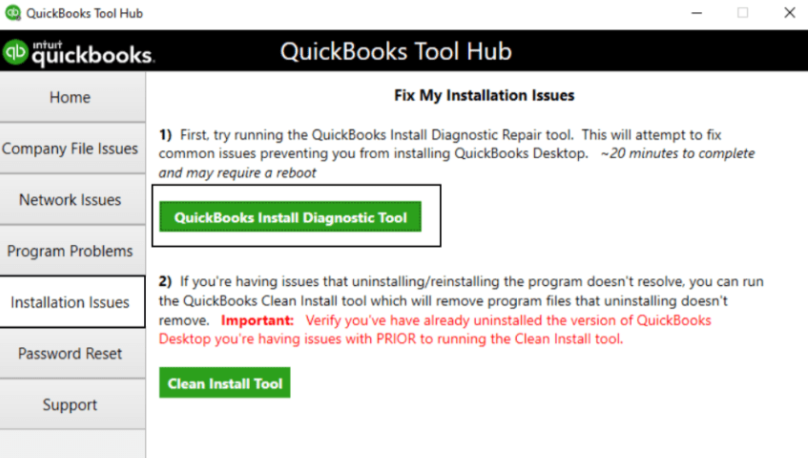
Once you do so, the tool starts scanning and finding the error. You can wait for at least 20 minutes to finish the process. When it is finished, you can reboot the PC. Thereafter, you can try installing your QuickBooks Desktop and check if you encounter QuickBooks 1904 error.
Fix 2: Modify the Account Settings on Windows
Running Windows computers without administrative rights can cause trouble accessing certain programs. This could also be the reason that you cannot install QuickBooks properly if you are not running Windows as an administrator.
Hence, in this method, we suggest you configure the Windows settings. For this, you are required to use the Command Prompt option. Thereafter, you can use the command to sign out, set permission in the File Explorer, reinstall QuickBooks and sign out.
- Click on the Windows “Start” button.
- Then, “Command Prompt” or “CMD” in the search bar.
- When “Command Prompts” appears in the result, click right on it and choose the “Run as administrator” option.
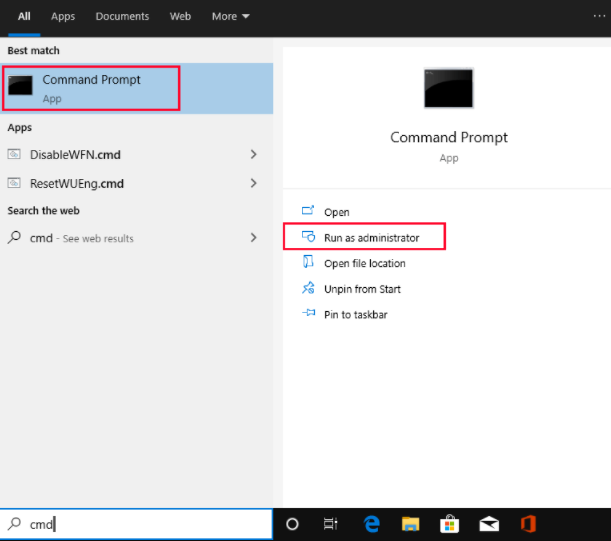
- In the “Command Prompt” window, type in “net user administrator/active:yes”.
- Press the “Enter” key.
- Once done, close the window.
- Then, go to the Windows “Start” button.
- Click the “Sign out” option.
- Then, move to the administrator account and log in to your account with admin rights.
Set User Permissions
- Click on the Windows “Start” button.
- Type “File Explorer” in the search bar.
- Then, search for “C:\Program Files\ Common Files”.
- Click right on the “Common files folder”.
- Then, switch to the “Properties” tab.
- After that, go to the “Security” tab.
- Now, select the “Edit” button.
- Here, click on the “user names” or “users in the group” section.
- At this point, go to the “Permissions for users” section and enable the following permissions:
- Read & execute
- Modify
- Read
- Write
- List folder contents
- Hit the “Apply” option.
- Then, click on the “OK” button.
Reinstall QuickBooks and Sign Out
- Click on the Windows “Start” button.
- Log out of your admin account.
- Then, sign in to the regular user account.
- Now, click again on the Windows “Start” sign.
- Then, “Command Prompt” or “CMD” in the search bar.
- When “Command Prompts” appears in the result, click right on it and choose the “Run as administrator” option.
- In the “Command Prompt” window, type in “net user administrator/active:no”.
- Press the “Enter” key.
After implementing all these steps, you can launch QuickBooks Desktop with your regular credentials and check if you find any error 1904 module failed to register QuickBooks.
Fix 3: Fix Microsoft MSXML Manually
By fixing the MSXML 4.0 manually, you can eliminate QuickBooks error code 1904 easily on your Windows computer. In case you install the QuickBooks program using a CD then you need to select the installation type for this whole process.
- Put the CD into your computer.
- If it shows up the “QuickBooks” software, you can close the window.
- Now, follow the instructions given on your screen. This will start installing the MSXML.
Here, we will show you the procedure of repairing Microsoft MSXML manually on Windows 7, 8, or 10.
Windows 10
- Click on the “Windows Taskbar” if opened.
- Locate the “msiexec.exe /forum “d:\QBOOKS\msxml.msi” using the search bar.
- Press the “Enter” key.
- If you have not saved the file in Local Disk D then you can replace it with some other drive name.
Windows 7 or Vista
- Click on the “Start” button.
- Type “msiexec.exe /forum “d:\QBOOKS\msxml.msi” in the search bar.
- Press the “Enter” key.
- If you see a different CD drive then replace it with the D drive.
Windows XP
- Open the “Run” dialog box using the “Windows + R” keys on your keyboard.
- Then, type in the following path:
- msiexec.exe /forum “d:\QBOOKS\msxml.msi
- Hit the “OK” button.
- If you see a different CD drive then replace it with the D drive.
This is how you can fix MSXML 4.0 manually on WIndows computer. By implementing these steps, you can rectify QuickBooks install error 1904.
Fix 4: Repair Microsoft .NET Framework
Microsoft .NET Framework is another component of a Windows computer. If there is any issue with the .NET Framework then your QuickBooks Desktop may not be accessed properly.
Here, you are required to check the settings for .NET Framework 3.5 SPI and .NET Framework 4.5 or later. But before that, locate .NET Framework from the Control Panel.
- Click on the “Start” button.
- Type “Control Panel” in the search bar.
- Open “Control Panel” when you see the results.
- Go to the “Program and Features” section.
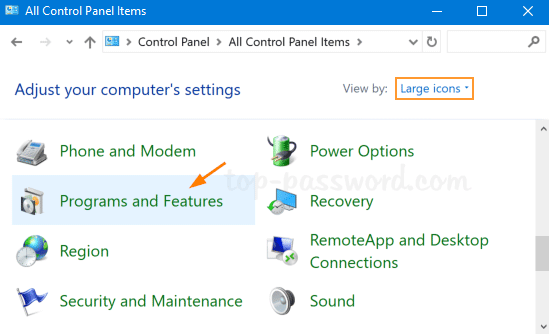
- Click on the “Uninstall a Program”.
- Click on the “Turn Windows features on or off”.
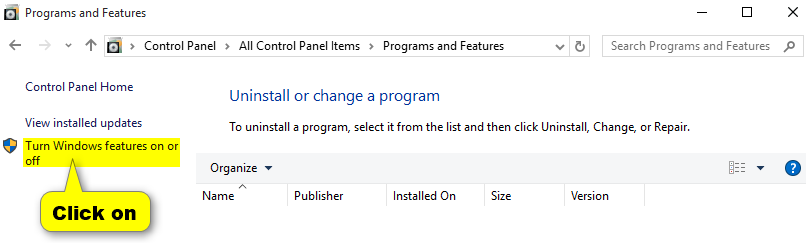
- Locate the “.NET Framework on the list”.
After finding the Microsoft .NET Framework, you can correct the settings for .NET Framework 3.5 SPI and .NET Framework 4.5 or later.
Review Settings for .NET Framework 4.5 (or later)
Perform these steps if you don’t find the checkbox selected:
- In the Windows Features” window, click on the checkbox to enable “.NET Framework 4.5 (or later)”.
- Click on the “OK” button to save changes.
- Then, restart your computer.
Perform these steps if you find the checkbox selected:
- In the Windows Features” window, click on the checkbox to disable “.NET Framework 4.5 (or later)”.
- Click on the “OK” button to save changes.
- Then, restart your computer.
- When you sign in again to your Windows computer then follow the prompts to enable “.NET Framework 4.5” again.
Review Settings for .NET Framework 3.5 SP1
Perform these steps if you don’t find the checkbox selected:
- Click on the checkbox to enable “.NET Framework 3.5 SP1”.
- Click on the “OK” button to save changes.
- Then, restart your computer.
Perform these steps if you find the checkbox selected:
- Click on the checkbox to disable “.NET Framework 3.5 SP1”. Make sure you don’t enable it again.
- Click on the “OK” button to save changes.
- Then, restart your computer.
- When you sign in again to your Windows computer then follow the prompts to enable “.NET Framework 3.5 SP1” again.
This way you can correct the settings for .NET Framework on a Windows computer. Thereafter, you can try installing QuickBooks on a Windows computer.
Fix 5: Add QuickBooks to Bitdefender Exclusion List
By adding your QuickBooks program, you can prevent QuickBooks installation from unnecessary restrictions or blockage. To add the QuickBooks program to the exclusion list can follow these steps:
Note: Those who use Bitdefender should read this method carefully. If you find an error that is associated with Bitdefender then you are supposed to follow this method.
- If you have a Windows operating system with 32- bit then enter C:\Program files\Common files in the exclusion list.
- If you have a Windows operating system with 64-bit then enter C:\Program Files\Intuit (C:\Program Files(x86)\Intuit) in the exclusion list.
As you enter these paths, you will notice the QuickBooks program has been added to the exclusion list. Thereafter, you can proceed with the QuickBooks installation. This way you can easily get rid of the QuickBooks error 1904 module failed to register.
Fix 6: Remove and Reinstall Adobe Flash Player
Adobe Flash Player can also be the reason that you are unable to install QuickBooks properly. In such doubts, you can uninstall Adobe Flash Player and then install it again on your Windows computer. You can uninstall Adobe Flash Player from the Control Panel.
- Go to the “Start” menu.
- Type “Control Panel” in the search bar and open it once appears in the result.
- Click on the “Uninstall a program”.
- Locate “Adobe Flash Player ActiveX” through your list of installed programs.
- Then, click on the “Uninstall” button.
- Follow the instructions given on your screen to remove the software.
As you remove the Adobe Flash Player, you can browse the same program from a trusted source. Thereafter, you can download and install it again on your computer. This will surely fix the error 1904 QuickBooks ICWrapper.DLL failed to register.
Fix 7: Refer to QBversionTool.dll
If QuickBooks Desktop error 1904 is referred to the QBversionTool.dll file then you should use the QuickBooks install diagnostic tool. Then, you can edit the admin settings. In this fix, you are required to check the permissions and install QuickBooks as admin is required.
Test the Permissions
Here, we will show you to create a note and save it to the folder. By doing so, you can check the permissions.
- Click on the Windows “Start” button.
- Type “Notepad” in the search bar and open it when it appears in the result.
- Here, in the notepad, write “QBTEST”.
- Then, go to the “File” menu.
- Click the “Save as” option. You can save it either “C:\Program Files(x86)\Common Files” or “C:\Program Files\Common Files”.
If you are not able to save the note to the folder then you are required to log in and install the QuickBooks program as an admin.
Install QuickBooks with Administrative Rights
- Click on the Windows “Start” button.
- Go to the “Sign out” option.
- Then, click on the account that shows the “admin and sign in” option.
Thereafter, you can start installing QuickBooks as an admin. This way you can test the permission and install the program as per the requirement.
To Sum Up
QuickBooks Desktop error 1904 occurs when installing the QuickBooks program on a Windows computer. If you configure the Windows accounts settings and troubleshoot QuickBooks, you can fix the error effortlessly. Here, we have served easy methods with a manual procedure. You can follow these fixation methods one after one and get rid of the error.
Installation errors can occur with different error codes on your screen. If you encounter QuickBooks install error 1712 then check this guide to find the relevant solution.