
 +1-877-790-2297
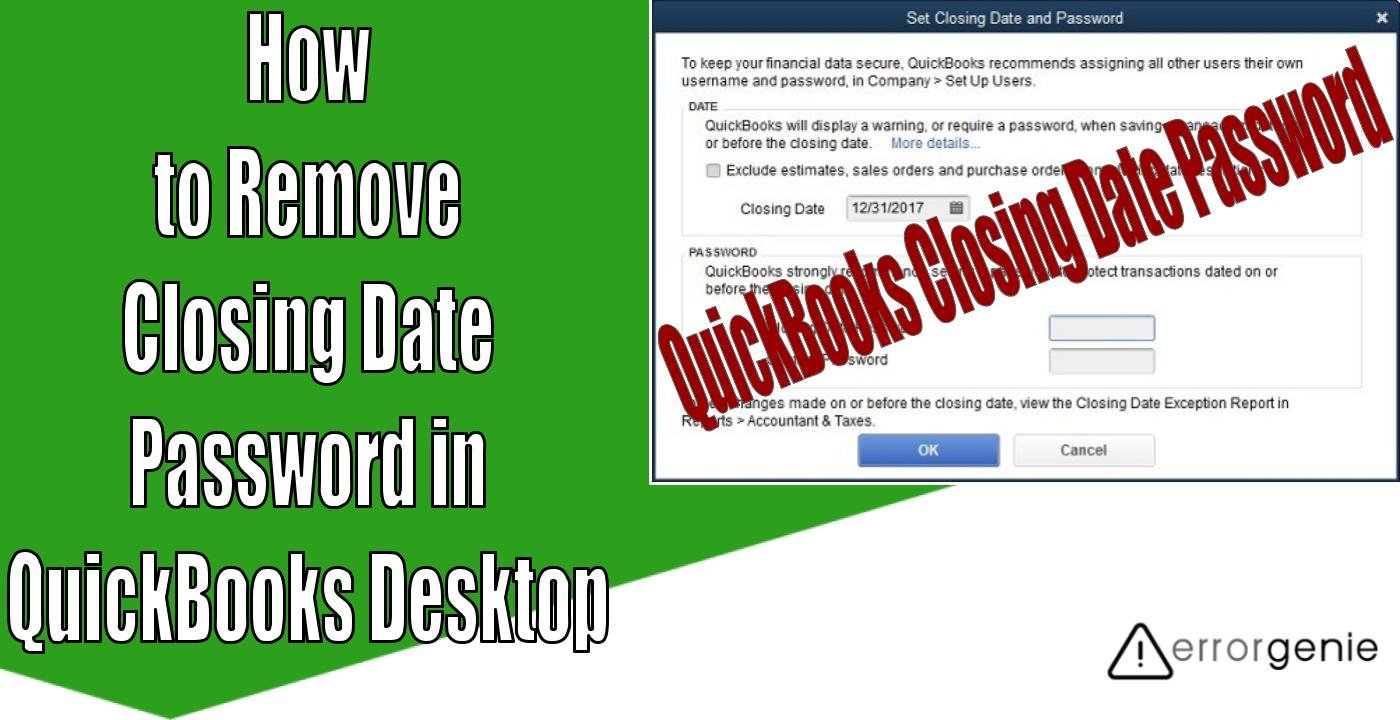
Most QuickBooks users close their accounting books when the new year begins. However, QuickBooks does not ask you to close the accounting book at the fiscal year-end. But, if you close it, this will help you to prevent accidental changes. To prevent mistakes, you can limit user access to the closed accounting period by adding a closing date and closing date password. Once you set the QuickBooks closing date password so that if any changes occur to the old books will require the password.
To get more valuable insights on how to change closing date password in QuickBooks, continue reading this guide. Here, we will also talk about how to remove closing date password in QuickBooks Desktop if you no longer wish to use the password.
How to Change Closing Date Password in QuickBooks Desktop?
To set or change the closing date and password, you just need to make changes to the company preferences in QuickBooks. Here, we will share the easy procedure for QuickBooks closing date password for Windows and Mac users:
Set Closing Date in QuickBooks Desktop for Windows
To set the closing date, you need to sign in to your account with administrator rights. This will give authority to change the closing date and password. To do so, you need to go to the Company tab, select the Set Closing Date tab, click on the Set Date or Password, and press the OK option.
Read these steps to learn how to change closing date password in QuickBooks software on a Windows computer:
- Launch “QuickBooks” software on your Windows PC.
- Then, click on the “Company” tab.
- Now, select the “Set Closing Date” option.
- Select the “Set Date or Password” field.
- Here, add the correct date in the “Closing Date” field.
- Switch to the “Closing Date Password” to add your password.
- After that, press the “OK” button to save changes.
Once you are done changing the QuickBooks closing date password, a message might be displayed to void the check. It also has the expense account and the transaction date prior to the closing date. You just need to click the Yes option. As you do so, QuickBooks Desktop will generate two Journal Entries. It will help you balance your accounts in case they are being affected by checks.
Note: Keep in mind that generating the Journal Entry is optional (learn more about How to Enter a Journal Entry and How to Delete Journal Entry in QuickBooks). If needed, you can void the check-in QuickBooks.
Set Closing Date in QuickBooks Desktop for Mac
QuickBooks Desktop for Mac users can also change or set the closing date and password. All you need to do is navigate to the Company tab, select the Users and Passwords button, choose the Set Closing Date, add the Closing Date or Password and then save changes.
To find out how to enter a closing password in QuickBooks Desktop for Mac, read the following steps:
- Open “QuickBooks” software on Mac PC.
- Click on the “Company” tab.
- Now, go to the “Users and Passwords” option.
- Go to the “Users and Passwords” option and select the “Set Closing Date” button.
- Add the closing date in the dedicated field.
- Now, go to the “Closing Date Password” field and add the password.
- Press “OK” to save the details.
When you are done following these instructions, you can close the window and continue using the closing date and closing password that you changed. This way you can enter a closing password in QuickBooks Desktop on Mac and Windows.
How to Change Closing Date Password in QuickBooks Online?
To change or set the closing date and password in QuickBooks Online, one has to open the QuickBooks Settings, open the Company settings, and edit the settings. Have a look at the following steps to change the closing date and closing date password in QuickBooks Online:
- Login to “QuickBooks Online”.
- Go to the “Gear” icon.
- Then, select the “Account and Settings” option from the “Your Company” section.
- Go to the “Advanced” section.
- Select the “Accounting” section and select the “Edit” option.
- Mark the “Close the Books” checkbox.
- Now, you can add the closing date. Remember the transactions dated before or on the closing date will not be modified without warning.
- Now, you can decide what you would like to display to your users if they save the transaction date prior to the closing date. Choose any of the following options:
- You can either allow users to change after seeing the warning. This will make the warning message display.
- Or, you can allow changes after seeing the warning and adding the password. Here, the user will have to add the password.
- Now, add the QuickBooks closing date password.
- Click the “Save” option.
- Later, select the “Done” option.
With these steps, you can change the QuickBooks Online closing date password. This should be noted that the admin of the company can make changes to the closed periods by using the closing date password Whereas, other users may have access to make changes depending on the user access they have got.
How to Remove Closing Date Password in QuickBooks Desktop?
Setting the closing date and password will save you from accidental changes. However, you might need to remove it in the future. This can be done through the Company Preferences tab. Learn with us how to remove closing date password in QuickBooks Desktop:
- Go to the “Accounting” menu.
- Then, open the “Preferences” tab.
- Switch to the “Company Preferences” option.
- Here, you will find the current “Closing Date”.
- Select the “Set Date or Password” button. This will open the “Set Closing Date/Password” screen.
- Now, you can remove the date from the “Closing Date” field.
- Press the “OK” button to save changes.
Since the admin or a user with privilege can set the QuickBooks preferences, it is not possible for other users to remove the closing date or password without higher privileges.
To Conclude
QuickBooks closing date password is used to protect the data from unwanted changes from the users. In this guide, we have shown you to set the closing date and closing date password in QuickBooks Online and QuickBooks Desktop including Mac and Windows users. Besides that, if you want to clear or remove the closing date and password, you can do it from the company preferences section.