
 +1-877-790-2297
Have you been looking for effortless methods to import invoices into QuickBooks? If so, then you have landed on the best page to explore these methods. Based on our knowledge of this Intuit accounting software, we have gathered the methods to import your invoices on QuickBooks and its versions such as QuickBooks Desktop, QuickBooks Online, QuickBooks Enterprise, etc. If you also have uncleared doubts like whether or not it is possible to import PDF invoices in this software, then you can clear them as well in this post.
Without any further delay, let us now consider reading the complete post.
Let’s check out how to import invoices into QuickBooks, Desktop, Online, and Enterprise. In addition to these methods, we’ll also tell you how you can import multiple invoices in this accounting software.
How to Import Invoices into QuickBooks from Excel?
This section will answer queries like “How can invoices be imported into QuickBooks from Excel”. Importing the invoices in this software can be possible via the menu labelled as File. Moving forward, choose Utilities and Import. Then click on Excel Files for going ahead.
- Open QB to access the “File” menu.
- Go to “Utilities”.
- Opt for the “Import” option for accessing the wizard of “QuickBooks Import Invoices”.
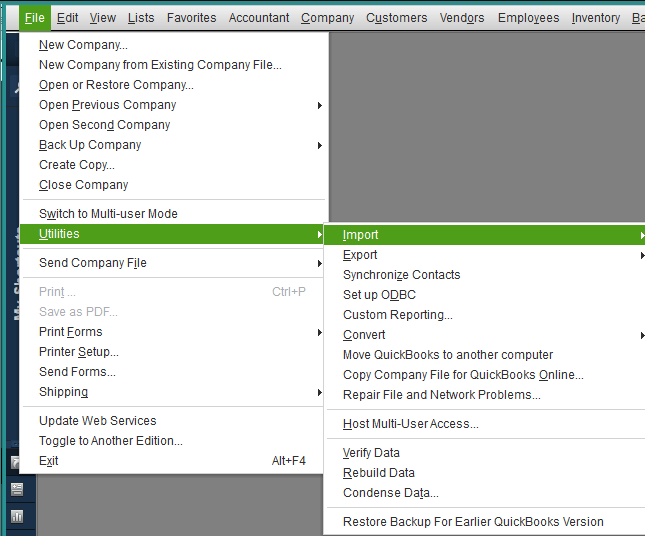
- Tap “Excel Files”.
- Then click on “Advanced Import”.
- Choose the file for importing it.
- Visit “Preferences”.
- Also, pick an option for dealing with QB errors as well as duplicate data.
- Press “Preview”.
- Select “Ok”.
After confirming your action, wait for your invoices to get imported into QuickBooks.
How Do I Import Multiple Invoices in QuickBooks?
Using QuickBooks, you can import multiple invoices too. To do so, you can prepare a spreadsheet. Then you can enable the Custom Transaction Numbers. This is followed by uploading the spreadsheet. After this, the import fields have to be mapped and the invoices have to be imported into QuickBooks.
- First prepare the spreadsheet. For this, enter the following in the columns:
i. “Invoice Number”
ii. “Invoice Date”
iii. “Customer”
iv. “Item Amount”
v. “Due Date”
vi. “Item Tax Code”
For several line items, every line entry should have the following details.
- Include the tax rate if needed. The tax codes made in QB can be mapped while importing.
- The column headings have to be mapped to every invoice field while importing.
Note: In case the spreadsheet is carrying new services, products, suppliers, customers, etc., they will have to be added to QuickBooks prior to importing the invoice.
- Now, the numbers for the custom transactions have to be enabled. For this, visit the “Settings”.
- Choose “Account and Settings”.
- Click on “Sales”.
- In the “Sales Form”, tap on “Edit”.
- Opt for “Custom Transaction Numbers”.
- Hit “Save”.
- Press “Done”.
Note: In case numbers are used for tracking the invoices, the “Custom Transaction Numbers” have to be turned on. In case these aren’t turned on, the invoices will automatically get numbered.
- Now, the spreadsheet has to be uploaded. In “Settings”, click on “Import Data”.
- Tap on “Invoices”.
- As an optional step, new services, customers, and products have to be added below “Browse”. After pressing “Browse”, choose the spreadsheet for the invoices. If new customers have been imported and the proper currency hasn’t been set, “INR” will be chosen. For importing invoices with foreign currencies, “Multicurrency” should be enabled.
- Hit “Next”.
- For mapping the import fields, the column headings of the spreadsheet and QuickBooks fields should match.
- Next, every column header having invoice fields should be mapped. Fields marked by an asterisk or (*) will be mandatory.
- For the fields which aren’t in the spreadsheet, choose “Not Applicable”. In case no service/product is added, “Sales” will appear.
- Pick “DD/MM/YYYY” as the date format.
- For tax, click on “Inclusive”/”Exclusive”. “GST” needs to be set for this option.
- Hit “Next”.
- For mapping the tax codes, the “GST Codes” need to be matched with those in QB.
- Click on “Next”.
- Then match the supply place with that of QB and press “Next”.
- The import summary has to be reviewed. Then click on “Start Import” and press “Ok”.
- Then press “Done”.
Note: For importing invoices having GST, the option will be auto-enabled. GST rates will have to be filled in the spreadsheet otherwise the calculation will be done on the basis of the GST codes. In case the GST amounts are added, the calculation will be overridden. For every invoice, “Place of Supply” and “GSTIN” should match for inter-state and intra-state sales. If there’s any discrepancy, you may find an error. Also, in case the “Tax Type” doesn’t apply to the “GST Registration Type”, an error will surface.
How Can I Import Invoices into QuickBooks Desktop?
The users of QuickBooks Desktop can visit the menu of File for importing their invoices. An option named Utilities will be shown here. This option has to be selected. Afterwards, click on the option of Import and tap on Excel Files using the dropdown.
Let us now go through all the instructions of this method by reading below.
- Open QB Desktop.
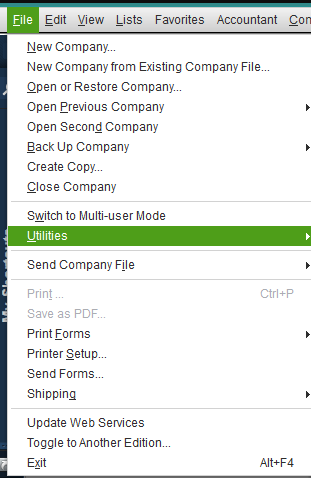
- Access the menu named “File”.
- “Utilities” have to be chosen
- .
- Pick the “Import” option.
- Go to the dropdown and select “Excel Files”. In case the CSV invoices have to be imported, then select the option for the same.
- You’ll be asked to edit or add several entries. Press “No”.
- Follow the instructions for importing.
- Choose the type of data.
After you import invoices to QuickBooks Desktop, a spreadsheet will open carrying your files.
How can You Import Invoices into QuickBooks Online?
For importing invoices to QBO, go to Utilities via File. Then open the wizard for the QB Import Invoices via the Import option. Make a selection for Excel Files and then go to Advance Import. After picking the files for importing, head to Preferences.
These are the complete steps you need to study how to import invoices into QuickBooks Online:
- Click-open “File” in QBO.
- Next, “Utilities” has to be selected.
- Click on “Import”. The wizard for “QuickBooks Import Invoices” will get launched.
- Choose the option of “Excel Files”.
- Select “Advance Import”.
- The files which have to be imported should be selected now.
- Switch to “Preferences”.
- While you import invoice data into QuickBooks, certain errors or duplicate data can occur. Choose the way to handle such issues.
- Tap on “Preview”.
- Press “Ok” and provide your confirmation.
How should I Import Invoices into QuickBooks Enterprise?
Like many versions of QB, QuickBooks Enterprise also allows you to import the invoices. To initiate the method to import them, you can head to Utilities to find the Import option. This is accompanied by selecting the files you’d like to import. After that, the wizard will guide you in administering the other prompts.
- Run “QuickBooks Enterprise”.
- The option of “Utilities” has to be chosen. This option is available in the “File” menu.
- Press the dropdown to enter the menu of “Import”.
- Choose the files for importing them.
- Press “No” when the option for editing or adding multiple entries appears.
- Follow the commands of the wizard.
- Also, select the data type for importing it.
When the above-mentioned steps are complete, an excel spreadsheet will open. It will carry your files as well as the imported invoices.
In Summary
QuickBooks comes with an option to import your invoices. Using the software, you can import single as well as multiple invoices. The method for importing the invoice in QuickBooks is similar. However, when you are using different versions of the accounting software, the steps of this method can slightly vary. For the numerous versions of the software, we authored the methods in the sections shown above. We hope we did a great job in assisting you to import your invoices.
At last, we’ll suggest you to keep reading our posts to stay updated about QuickBooks and its features.
Frequently Asked Questions
We hope we didn’t miss out on anything to help you import invoices into QuickBooks 2013, 2014, 2015, etc. In case we did, the following FAQs can assist you.
Ans. You can import invoices into QuickBooks from CSV, XLS, and XLSX format. For importing a PDF invoice, you can convert the same into Excel. After that, you’ll be able to import it.
Ans. In QuickBooks Self-employed, you can attempt to import your invoices. In its “Settings”, you will find the “Import” option. You can click on it to initiate the procedure.
Ans. Yes, in QuickBooks Desktop, invoice templates can be imported via the Lists option. You’ll see the “Templates” option here. After choosing the same, you can access the dropdown and click on “Import”.
Ans. Along with your invoices, you can import bank transactions, batch transactions, vendors, customers, general journal entries, accountant’s changes, etc.