
 +1-877-790-2297
QuickBooks allows its users to integrate email services into their accounting software. By doing so, you can enhance the efficiency of your accounting software and its features. As you connect the email service with QuickBooks Desktop, you can send invoices, receive reports, and perform other important tasks. Thus, we are here to inform you how to setup email in QuickBooks Desktop for different versions including 2012, 2013, 2014, 2015, 2016, and 2017.
- What Are All the Email Options in QuickBooks Desktop?
- How to Setup Email in QuickBooks Desktop?
- Method 1: How to Setup Email in QuickBooks using Outlook?
- Method 2: How to Setup Email in QuickBooks 2016 and Other Versions using Webmail?
- Method 3: How to Setup Email in QuickBooks 2017 and other Versions using QuickBooks Email Service?
- Method 4: How to Setup Email in QuickBooks 2014 or Other Versions using Regular Email Service?
- Benefits of Setting Up an Email in QuickBooks
What Are All the Email Options in QuickBooks Desktop?
QuickBooks email setup can be done in three different ways. In case you fail to set up the email for a particular service then you can proceed with another one. Remember that you may not see all the email service options every time. These email options are as follow:
- Outlook: Those who have installed Microsoft Outlook already can use this service. Moreover, Outlook serves more smart features and it is the most preferred email client for the users.
- Webmail: This is another email service that can be integrated with the QuickBooks Desktop. Webmail came in 2011 to bridge with Yahoo, Gmail, and for the user who owns email platforms.
- QuickBooks Email: This option is less preferred by the users as it does not hold attractive features. Hence, users prefer Outlook as the best email service for QuickBooks Desktop.
Apart from this, you can use the regular email services with QuickBooks Desktop. It includes Gmail, Hotmail, and Yahoo email services.
How to Setup Email in QuickBooks Desktop?
As stated earlier, there are different email options for QuickBooks such as Outlook, Webmail, and QuickBooks email. Besides that, regular emails such as Gmail and Yahoo can also be integrated with QuickBooks. Here, we will show you a detailed procedure for setting up email services with your QuickBooks program.
To proceed with it, you will have to configure QuickBooks along with the reports, email invoices, and transactions that use Outlook, Webmail, Gmail, etc. In addition, you have to ensure that the email option such as Outlook must be compatible with your QuickBooks version.
Now, let’s proceed with how to setup email in QuickBooks 2012, 2013, 2014, 2015, 2016, or 2017 using different email options.
Method 1: How to Setup Email in QuickBooks using Outlook?
First of all, create a QuickBooks Outlook email. But, if you have an existing account for Outlook then you can go to the main procedure. To set up an Outlook email client with QuickBooks Desktop, you are required to gather the necessary information. Thereafter, you can set up Outlook services in QuickBooks Desktop.
To do so, you can go to the Preferences, select the Edit button, and hit the Send forms. At this point, you can choose Outlook as your email client option.
Here is the step by step guidance:
- Open “QuickBooks Desktop”.
- Go to the “Edit” menu. This should be located at the top of the menu bar.
- Here, you can go to the “Preferences” option.

- Press the “Send Forms” option.
- Select the “My Preferences” option.
- At this point, you will see three different options. From here, you will have to choose the “Outlook Radio” option.
- Now, you can close the “Preferences” window.

To verify if you have set up Outlook as your email client with QuickBooks Desktop, you can send an email to the test email address. If you receive the email successfully on your test email address then you are good to go.
However, some users find errors while setting up the Outlook email with QuickBooks Desktop. In such a scenario, you can proceed with the second email option.
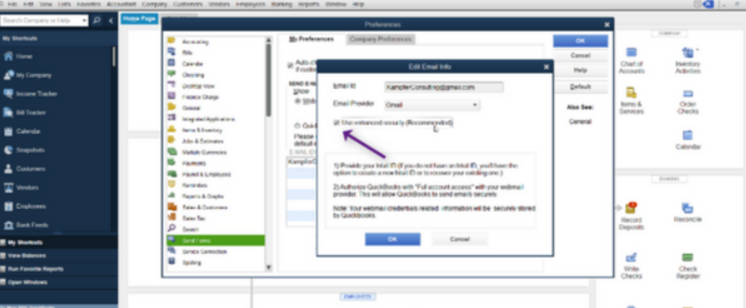
Method 2: How to Setup Email in QuickBooks 2016 and Other Versions using Webmail?
QuickBooks users who use a new version of their accounting software can easily set up the Secure Webmail. This becomes easy and safe to send email via Webmail service. Talking about Secure Webmail, this email option works when you link your Webmail and Intuit accounts with each other.
Once you connect both your accounts, you will not need to enter the password repeatedly when you send emails to the concerned person.
To get started with how to setup email in QuickBooks 2013 and other versions using Secure Webmail, you can pursue the following steps:
- Launch “QuickBooks Desktop”.
- Select the “Edit” menu. This will be available at the top of the menu bar.
- Then, switch to the “Preferences” option.
- Click the “Send Forms” option.
- Click on the “My Preferences” option.
- At this point, you will see three different options. From here, you will have to choose the “Webmail Radio” option.
- Add the “Email address” that you are going to use with QuickBooks.
- Now, click on the “SSL Security” checkbox.
- Here, add the correct “SMTP Server”.
- After this, you can enter the right “Port Configuration”.

- Here “OK” has to be selected.
After performing all these steps, you should test if you have successfully set up Secure Webmail with QuickBooks Desktop. To determine this, you can send an email to the test email address. If you receive the email successfully on your test email address then you are good to go otherwise move to the other email option.
Method 3: How to Setup Email in QuickBooks 2017 and other Versions using QuickBooks Email Service?
QuickBooks email services can also be used. All you have to do is adjust the settings in QuickBooks by selecting the email option and adding the required details. Let’s discuss the entire procedure of integrating email service with QuickBooks Desktop.
- Go to the “QuickBooks Email Settings”.
- Then, click on the “QuickBooks email” option.
- Enter the details that are necessary such as password, username, email address, etc.
Once you are done adding up the details, you will be done by the email setup in QuickBooks. The process of QuickBooks email service is quite easy however, it is not quite helpful as it lacks advanced features.
Method 4: How to Setup Email in QuickBooks 2014 or Other Versions using Regular Email Service?
As mentioned earlier, you can use the regular email services with QuickBooks Desktop such as Gmail, Hotmail, and Yahoo. All you are required to enter the correct port information and save it.
Here we will show the procedure of setting Gmail and Yahoo email service with QuickBooks Desktop in detail.
Setup Gmail/Yahoo in QuickBooks Desktop
To set up a regular email option such as Gmail/Yahoo in QuickBooks Desktop, you just need to enter the information of the email provider. Make sure you set Gmail/Yahoo as your default account to send email only from this account.
- Open your “QuickBooks” program.
- Click on the “Edit” menu from the top of the menu bar.
- Now, switch to the “Preferences” option.
- Click on the “Send Forms” option.
- Hit the “My Preferences” option.
- Here, you will see a window where you can enter the necessary details of the Gmail/Yahoo account.
- Choose “Gmail/Yahoo” using the “Email Provider” dropdown option.
- Here, “OK” has to be selected.
- In the “Email ID” field, you will find the “Gmail/Yahoo” account created by you. Here, you have to make sure that you choose the account as a default account.
- Here, “OK” has to be selected.
To confirm if you have set up Gmail/Yahoo as your default email client with QuickBooks Desktop, you can send an email to the test email address. If you receive the email successfully on your test email address then you are good to go.
Benefits of Setting Up an Email in QuickBooks
Before learning how to setup email in QuickBooks 2014 or other versions, one should be aware of the perks of integrating email services with QuickBooks Desktop.
- QuickBooks users can send immediate invoices via email whenever the customer requires.
- Email integration allows you to send reminders for customer payments by sharing the invoices.
- By setting up QuickBooks email, it works like a tracking device for the contact details of vendors and clients.
- Users can also import data directly from the Spreadsheets.
- After integrating the email services with QuickBooks, you can prepare a product list and share it with the vendors.
There can be other minor to major benefits you can obtain by setting up the QuickBooks emails. For instance, you can run QuickBooks efficiently with smart features provided by email services.
Final Words
In QuickBooks, you can integrate numerous email services. It includes Webmail, Outlook, QuickBooks email, Gmail, Yahoo, and others. To set up an email account in QuickBooks, all you have to do is choose the type of email method, enter the required details, and save changes. In this guide, we have shown to setup email in QuickBooks Desktop for different versions. We hope you find this guide useful.