
 +1-877-790-2297
Presently, QuickBooks Online has two decimal places which are set by default. On the other hand, QuickBooks Desktop manages the transaction in foreign currency. With this program, you can have five decimal places. However, there are many users who want to adjust the number of decimals in the QTY block of Bills of Materials. That is when a user comes up with a question “how do I change decimal places in QuickBooks Desktop or Online?”.
If you want to adjust the decimal places to more than 2, it can be possible. But remember QuickBooks does not allow you to change the digits more than the accepted ones. In this guide, we are going to help you with a number of methods so that you can add different decimal places in the items list. Let’s find out how to change number of decimal places in QuickBooks Desktop and QuickBooks Online.
- How to Change Decimal Places in QuickBooks Desktop?
- Method 1: Activate 4 Decimal in Company Preferences
- Method 2: Select the Rounding of the Decimal Places
- Method 3: Change the Decimal Separator in Windows Settings
- Method 4: Set the Cost Amount into 4 Decimal Places
- How to Change Decimal Places in QuickBooks Online?
How to Change Decimal Places in QuickBooks Desktop?
To change the decimal places, you can opt for different methods in QuickBooks Desktop. For instance, you can choose the four decimal from the company preferences, choose the rounding of the decimal places, use the decimal separator from Windows’ Control Panel or adjust the cost amount to four decimal places. In the following discussion, you will learn how to change decimal places in QuickBooks Desktop. Let’s read ahead!
Method 1: Activate 4 Decimal in Company Preferences
QuickBooks allows you to record the item QTY by certain decimal places. If you want to use the 4 decimals point, you will have to enable this feature in company preferences. By doing so, QuickBooks automatically places the decimal point in item quantity. To enable the decimal preference, you can go through the following steps:
- Launch “QuickBooks Desktop”.
- Navigate to the “Edit” menu.
- Click on the “Preferences” option.
- Once you get into the “My Preferences” tab, you can place the checkmark for the “Automatically Place Decimal Point” option.
- After this, click the “OK” button.
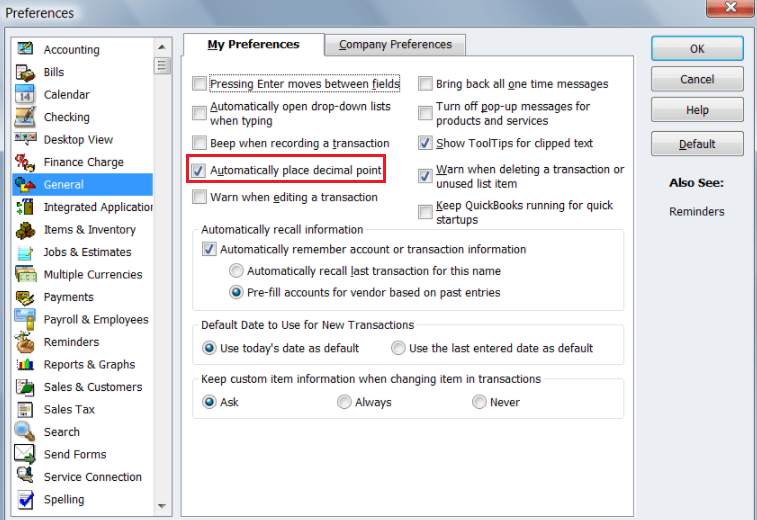
As you set the preference in QuickBooks Desktop, you can continue adding the 4 decimal for the item qty. However, you will have to round off the item to track it accurately in QuickBooks.
Method 2: Select the Rounding of the Decimal Places
If you have advanced pricing features, you have an option to handle the price rounding. All you have to do is select the rounding of the decimal places. This can be done by following these steps:
- Navigate to the “Edit” menu located on the top.
- Then, switch to the “Preferences” option.
- Select the “Sales & Customers” tab.
- Now, switch to the “Company Preferences” tab.
- Once done, you can scroll down to the “Custom Pricing section.
- After this, you can mark the “Use the same rounding across all price rules” radio icon.
- Here, you can choose the “Select” drop-down menu. You will also see the “Set rounding on each price rule” option.
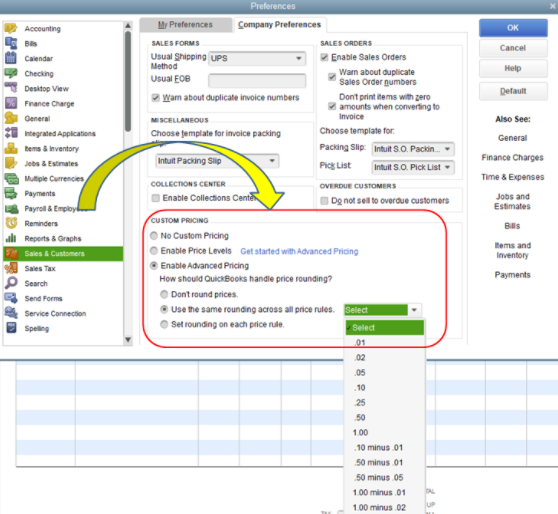
This is how you can set up the price rounding if using the custom price rules feature. However, if you don’t have this feature then you will have to select the minimum number of decimal places from a template of transaction.
Method 3: Change the Decimal Separator in Windows Settings
Many users want to change the decimal separator for QuickBooks. If you have a comma separator between decimal parts and integers and you want to replace it with a point then setting the right preference in Windows Settings may help you. All you have to perform the following steps in Windows settings:
- Launch “Control Panel” on your Windows computer.
- Move to the “Clock, Language & Region” section.
- Here, you can click on the “Region” option.
- Then, select the “Change date, number, time formats” option.
- Click on the “Additional setting” option.
- Here, you can select the “Decimal Symbol”.
By following these steps, you can easily change the decimal separator through the Windows settings.
Method 4: Set the Cost Amount into 4 Decimal Places
If you want to set up the cost amount with four decimal places, you can open the Item List from the List menu. Once you open the item, you can add the desired cost as well as the sales price. Read the detailed steps:
- Click on the “List” menu.
- Then, select the “Item List” menu.
- Click twice on the item.
- After this, you can add the desired “Sales Price” and “Cost”.
- Press the “OK” button.
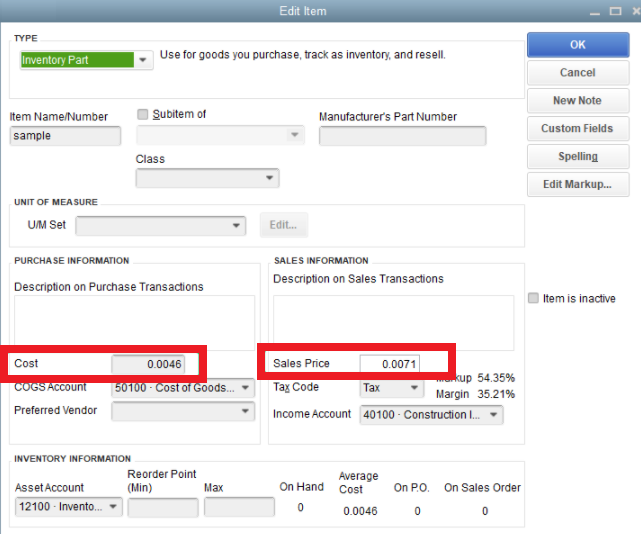
This is how you can set up the cost into 4 decimal places in QuickBooks Desktop. Make sure you enter the correct cost and sales price while saving the details.
How to Change Decimal Places in QuickBooks Online?
To adjust the decimal places in the invoices, you can go through the QuickBooks account settings. All you have to do is go through the Account and Settings menu. Thereafter, you can switch to the Advanced option, click on the Other Preferences, choose the desired Number Format, and save the details. Here are the detailed steps for the same:
- Click on the “Gear” icon in QuickBooks Online.
- Then, navigate to the “Account and Settings” menu.
- Click the “Advanced” option on the left.
- Once done, you can click anywhere on the “Other Preferences” section.
- Choose the “Number format” drop-down menu.
- After this, click on the “Save” button.
- To complete the steps, click the “Done” button.
As you follow these steps, the decimal places can be saved easily in QuickBooks Online. Please note that it also changes the format of dollar amounts in other reports and transactions.
After you add the decimal places to your transactions linked with the account in the program, you should verify that the accounts are accurate. To determine this, you can import the Account QuickReport to Excel. After this, you can format the Balance and Amount cells to three decimal places. You can pursue the following steps stated below:
- Click on the “Accounting” menu located on the left.
- Then, select the “Chart of Accounts” option.
- Here, you can find your account and then hit the “Run Report” option using the “Action” column.
- After this, click on the “Export to Excel” option.
- Choose the “Amounts” cell and click right on it.
- Here, you can select the “Format Cells”.
- Then, switch to the “Numbers” tab.
- Now, you can choose “Decimal Places” in drop-down menu.
- Press the “OK” button.
The same procedure can be followed for the Balance cell. This way you can change the decimal places by importing the Account QuickReport to Excel.
In Brief
QuickBooks has certain decimal places in item qty. However, you can change it to some other decimal number. All you have to do is go through the company preferences or QuickBooks settings and add a number of decimal places you want to add. Please note there are some limitations depending on the version you are using of QuickBooks. We hope you have understood how to change number of decimal places in QuickBooks Desktop and Online.